Follow-up schedules can include a combination of any of your project’s interaction types, which can be customized to suit your team’s needs. Most follow-up schedules include emails (which can be automated) and phone calls. After at least one follow-up schedule is created, it can be automatically added to contacts as they register or manually added by the sales team.
Creating a New Follow-Up Schedule
To create a new follow-up schedule, navigate to Menu → Contacts → Follow-up Schedules and click the New Schedule button.
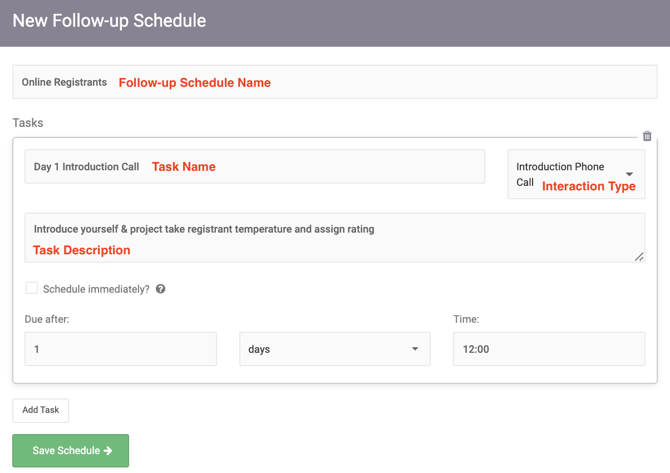
Name the follow-up schedule, then enter the first task:
- Name the task
- Select the interaction type
- Describe the task
- Schedule the task
Special Interactions
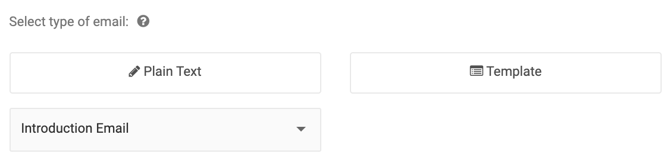
If the interaction type is set to an email, you will be given the option to select the type of email to send – a plain text email or an email template. If you choose to send an email template, select the correct template to send.
You will also be given the option to automatically send the email on the scheduled date and time. Select this option if you want the email to be sent with no additional direction from the sales team. If you would prefer that the email is reviewed to make sure it is still appropriate for each individual contact before it is sent, do not select the auto send option. The task will appear on the calendar and a team member will need to manually send the email after checking its content.

Note: In order for email events to auto send, the contact must have an assigned team member prior to the follow-up schedule being applied. If the contact does not have an assigned team member, the email cannot auto send.
Editing a Follow-Up Schedule
Editing a Follow-Up Schedule is very simple. Navigate to the Follow-Up Schedule page (Menu → Contacts → Follow-up Schedules) and click the pencil icon to the right of the follow-up schedule, then click on a task to edit it. Once the desired changes have been made, click Save Schedule.
Note: Any edits made to a follow up schedule will apply to the events going forward but will not be applied to existing follow up schedule events.
Applying a Follow-Up Schedule to a Contact
There are several ways to apply a follow-up schedule to contacts:
- Automatically, via registration form
- Manually, by mass action
- Manually, from a contact profile or interaction
Automatically Adding a Follow-up Schedule (Registration Form)
To automatically apply a follow-up schedule to contacts registering via a registration form, navigate to the Registration Forms page (Menu → Forms → Registration Forms) and click the micromenu next to the desired form to view the form settings. In the Auto-Assignment section, choose the follow-up schedule to apply to contacts and to contacts who have indicated they are agents using the dropdown list. See the Registration Form Settings article for more information.

Manually Adding a Follow-up Schedule (Mass Action)
To apply a follow-up schedule to a particular set of contacts after they have registered or if they were added to the project either manually or by import, use either the contact list page or advanced search to target the contacts, then use the ‘Change follow-up schedule’ mass action button to apply a new schedule.

Note: this will override any previously applied follow-up schedules and begin the new schedule from the first task. It is not possible to begin part way through a follow up schedule or resume at the previous task if you re-apply a schedule that has been previously applied to a contact.
Manually Adding a Follow-up Schedule (Individual Contact)
To apply a follow-up schedule to an individual contact, either when creating them or as a subsequent action, locate the Follow-up Schedule (for new contacts) or Events (for existing contacts) section of their profile and use the dropdown list to select the desired schedule.

Removing a Follow-Up Schedule from a Contact
To remove a follow-up schedule from a particular set of contacts, use either the contact list page or advanced search to target the contacts, then use the ‘Change follow-up schedule’ mass action button to select the schedule, check “remove selected schedule,” and click Apply.
Removing a Follow-up Schedule (Individual Contact)
To remove a follow-up schedule from an individual contact, navigate to the contact’s profile and select Edit from the micromenu at the top right of the page. Scroll down to the Follow-up Schedule section, click on the dropdown list, and use the delete button on your keyboard to delete the entry. Click Update to save the change.
Watch the Video Tutorial!