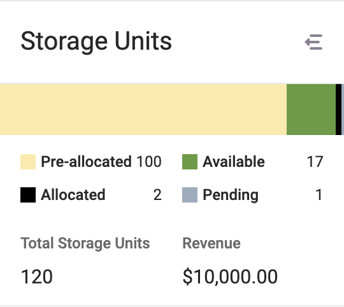
To find the Storage List, go to Menu → Inventory → Storage. Similar to the contacts and contracts lists, the Storage List can be filtered by a number of criteria including status, type, upgrades, pricing, and building. At the top of the filter category list, there is also a status bar and storage breakdown by status and revenue. The revenue total is generated by storage subtotals when a contract is firm.
Additionally, the following information is available for each storage unit: type, list price, upgrades, unit, status, upgrades price, building, location, floor, size, storage unit number, date, added, and last changed. If some of these columns are hidden from your default view, click the columns button to the right of the column headers to select which columns you would like to see.
Adding Storage Units (Inventory)
If your user role is Manager, Conveyancer or Administrator, storage can be added from the Storage List by selecting New Storage Unit from the micromenu at the top of the page. This will open a modal that displays the total number of existing storage units for the project and the number of storage units required to meet the pre-allocation demand. Enter the number of storage units to create. By default, these will be added to the Standard type, but the number of storage units for each type can be adjusted later.
If storage unit numbers are known at this time and are continuous, they can be entered starting with the first number in the sequence. Otherwise, they can be entered later.
Once the desired information has been entered, click Create.
Editing Storage Units (Inventory)
To edit a storage unit from the Storage List, click on the micromenu to the right of the storage unit and select Edit. Choose the storage type from the dropdown list, update the list price, switch the editable toggle off to prevent the storage type from being changed on the contract, update the storage unit number (and its prefix, suffix, floor, building, or location if applicable), and apply an upgrade. Click Update to save your changes.
Performing Mass Actions on Storage Units (Inventory)
Provided your user role has the appropriate permissions, the Storage List also allows mass actions to be applied to selected storage units. Use the filters to narrow down the list if necessary, then select the storage units to apply an action to. The available actions are Change Status, Assign Type and Update List Price.
The Change Status action applies a new status to the selected storage units. Note, however, that the Pre-allocated, Pending and Allocated statuses are tied to particular contract statuses and cannot be mass applied to the storage inventory. Only the Available status and any custom statuses created in your project settings can be applied in this section. When you are done, click Update.
The Assign Type action applies a new storage type to the selected storage units. The dropdown list displays only types that are not already at their limit so if the maximum number of a particular type is reached, it is not possible to assign this type to additional storage units without adjusting the limit in the project settings. This feature helps to prevent overselling storage types. When you are done, click Update.
The Update List Price action applies a new list price to the selected storage units. The only way to update the price of existing storage units is to update them individually by editing or by applying an update list price mass action. Updating the price in the project settings will only apply the updated price to newly created storage units. Similar to the price update mass action for inventory units, be sure to select whether you want change to a specific price or to add/subtract subtract a percentage or dollar amount, and whether you want to round your figures if applicable. When you are done, click Update.
Deleting Storage Units (Inventory)
It is not possible to delete a storage unit with the status Pre-allocated, Pending or Allocated, but it is possible to delete other storage units from inventory if required. Click on the appropriate storage unit and then click Delete.